Dartfish 2026 introduces Advanced Filtering, a new system that allows users to create and reuse complex event filters when analyzing videos.
This feature expands the traditional keyword filtering system by allowing users to:
Create reusable custom filters
Save filtering logic for later use
Apply filters quickly during analysis
Manage filters centrally
Advanced Filtering is designed to improve productivity when working with large event datasets.
This short video gives you a brief overview of the feature
Requirements
Advanced Filtering is available only in:
myDartfish 360 S
myDartfish Live S
myDartfish Pro S
Concept
Advanced Filtering was introduced to improve how analysts search and organize events during video analysis.
In previous versions of Dartfish, filtering relied mainly on manual keyword selection.
Users could select keywords to filter events, but the filtering logic had several limitations:
Filters had to be recreated manually each time
Complex filtering required multiple manual selections
Filters could not easily be reused across analysis sessions
Advanced Filtering addresses these limitations by allowing users to create reusable filtering rules.
Instead of manually selecting keywords every time, analysts can now:
Save filtering logic as reusable filters
Apply filters instantly during analysis
Manage filters centrally through the Filter Manager
Filters operate on event metadata and can evaluate several event properties, including:
Event name
Event description
Event keywords
Event color
This makes it possible to quickly isolate specific types of events during analysis.
By saving these filters, analysts can reuse the same analysis logic across multiple games, improving both efficiency and consistency.
Limitations
Filtering applies only to event metadata.
Filters must be created manually
Creating, Using, and Managing Filters
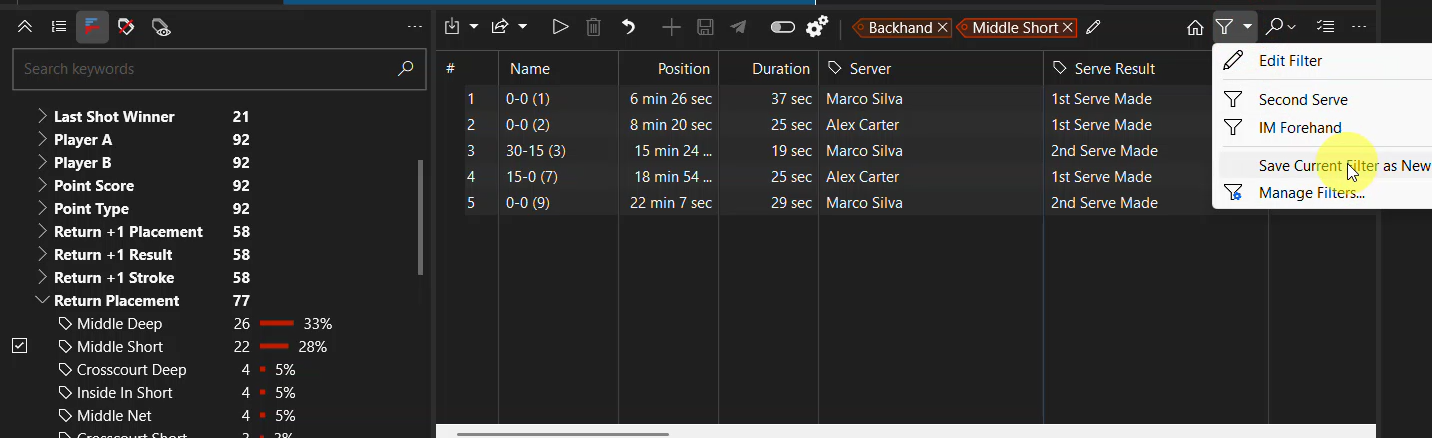
Advanced Filtering is accessed through the Manage Filter menu.

The filter menu provides four main actions:
Edit Filter
Select an existing filter
Save as New Filter
Manage Filters
This allows users to quickly reuse filters across analysis sessions.
Creating a New Filter
Filters can be created in two different ways:
- From the current keyword filtering
- Directly from the Filter Manager
Creating a Filter from the Current Keyword Selection
This is the fastest way to create a filter when you are already filtering events using keywords:
Apply a keyword filter to the event list.
Click Manage Filter.
Select Save Current Filter as New Filter.
Enter a name for the filter.

Creating a Filter from Scratch
Filters can also be created directly in the Filter Manager:
Open Manage Filter.
Select Manage Filters.
Create a new filter.
Define the filtering criteria.
Applying an Existing Filter
Once a filter has been created, it can be applied instantly during analysis.
To apply a saved filter:
- Open the Manage Filter menu.
- Select the desired filter.
- The event list immediately updates to display the filtered events.

This allows analysts to quickly switch between different analysis views.
Managing Filters
All saved filters can be managed through the Filter Manager.
The Filter Manager allows users to:
View all existing filters
Create new filters from scratch
Edit filter rules
Rename filters
Delete filters

Key Takeaway
Advanced Filtering allows analysts to create reusable event filters, making video analysis faster and more structured.
It improves:
Efficiency
Consistency of analysis
Reusability of filtering logic
This feature is particularly valuable for analysts working with large datasets or repeated tactical patterns.